Introduction
In this third part of the multi-part tutorial I will be walking you through setting up the github actions. As I mentioned in the first part of the blog the plan was to create a private repository in github which will contain all the original settings files and markdown posts. The generated website will then be posted in github-pages as a public repository.
There are a number of ways to accomplish this. The easiest is to upload the locally generated _site folder to github public repository. Another more elegant way is that every time we push our local repository to github that will trigger a build process which would generate the static site using github actions and then push that into the public repository. This is the route that we will take as it is more elegant and it also helps us familiarise ourselves with the github actions concept.
Github actions
First lets look at my github actions code. This is the file pages-deploy.yml inside the /test-privaterepo/.github/workflows folder
1
2
3
4
5
6
7
8
9
10
11
12
13
14
15
16
17
18
19
20
21
22
23
24
25
26
27
28
29
30
31
32
name: Build and deploy jekyll site

on:
  push:
    branches:
      - master

jobs:
  jekyll:
    runs-on: ubuntu-latest # can change this to ubuntu-latest if you prefer
    steps:
      - name: setup
        uses: actions/checkout@v2

      - name: setup ruby
        uses: ruby/setup-ruby@v1
        with:
          ruby-version: '3.0' # can change this to 2.7 or whatever version you prefer

      - name: install dependencies & build site
        uses: limjh16/jekyll-action-ts@v2
        with:
          enable_cache: true

      - name: deploy
        uses: peaceiris/actions-gh-pages@v3
        with:
          publish_dir: ./_site
          personal_token: ${{ secrets.JEKYLL_PAT }}
          external_repository: pemd-sys/pemd-sys.github.io
          publish_branch: main
There is a lot happening in the script so let me walk you through this. First action is on:push:master, this basically means that the code gets triggered every time we do a push onto the master branch in github.
The next action setup: checkout@v2 essentially checks out the master branch into the github CI/CD server. So basically once triggered the github action spawns a process which runs on ubuntu-latest container and in that it basically does a git clone in the server.
Then the next lines are setting up the ruby interpreter as it does not come standard with ubuntu-latest. The ruby version has been fixed here to 3.0 as there are some problems with google-protobuf-3.21.12-x86_64-linux which requires ruby version < 3.2.dev, >= 2.5. The lates version of ruby is 3.3 and that causes the build to fail. Go figure !!
The next few lines which uses limjh16/jekyll-action-ts@v2 basically runs jekyll on the checked out branch which then generates the latest _site folder.
Once the _site folder has been generated now comes the tricky part. To use github actions to push the contents of _site folder onto the public repository. As a refresher our development repository is pemd-sys/test-privaterepo which is a private repository and our blog website is pemd-sys.github.io/ which is public repository.
Fortunately someone has already written some code to do this, namely peaceiris/actions-gh-pages@v3, which can push contents of a directory to a different repository. However, to allow github actions to change you repository we need to provide a access token.
how to create an Private Access Token for Github Actions
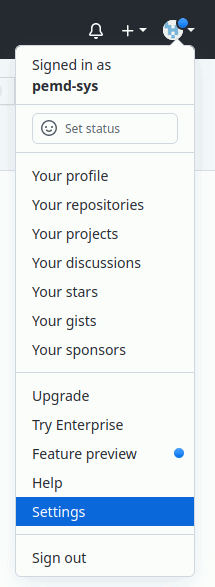
First we have to create a private access token. First go to your profile->settings as shown below.
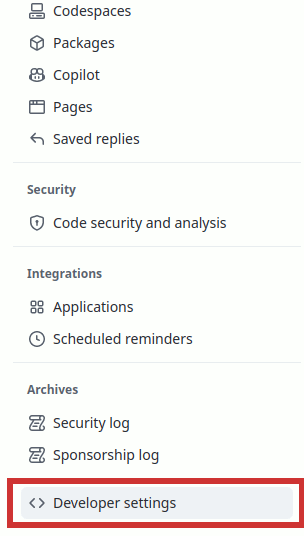
Then go to the developer setting menu as shown below
Then go to fine grained token menu and press the generate token button as shown below.

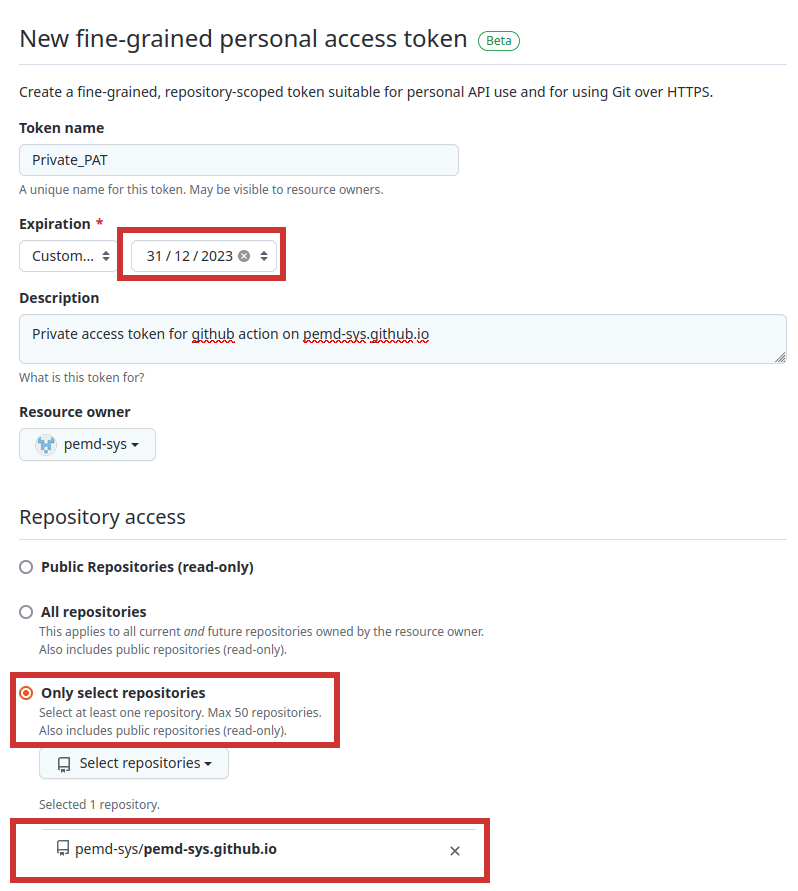
This open up the form similar to that shown below. I used the maximum allowable expiration date of 1 year, added a description of what the token will be used for.
 Token Settings Menu
For this tutorial we only need the token to access 1 repository, which is our github.io page, so we grant read-write access to github actions for only that repository.
 Token Settings Menu
This shows the overview of the token creation. Go ahead and press the generate token button.  User Settings Menu
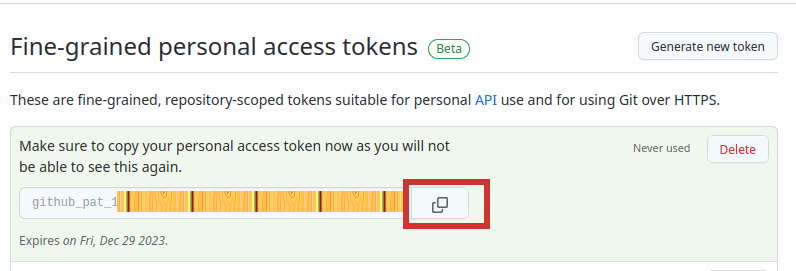
Immediately after pressing the generate token button, github takes you to the following page, where the private token is display. Press the copy button and copy the private token.
 User Settings Menu
Finally go to your private repository (which holds your jekyll source) and add the personal access token to the secrets menu. Take care to use the same NAME as the one in the github actions script as the name has to be the same.
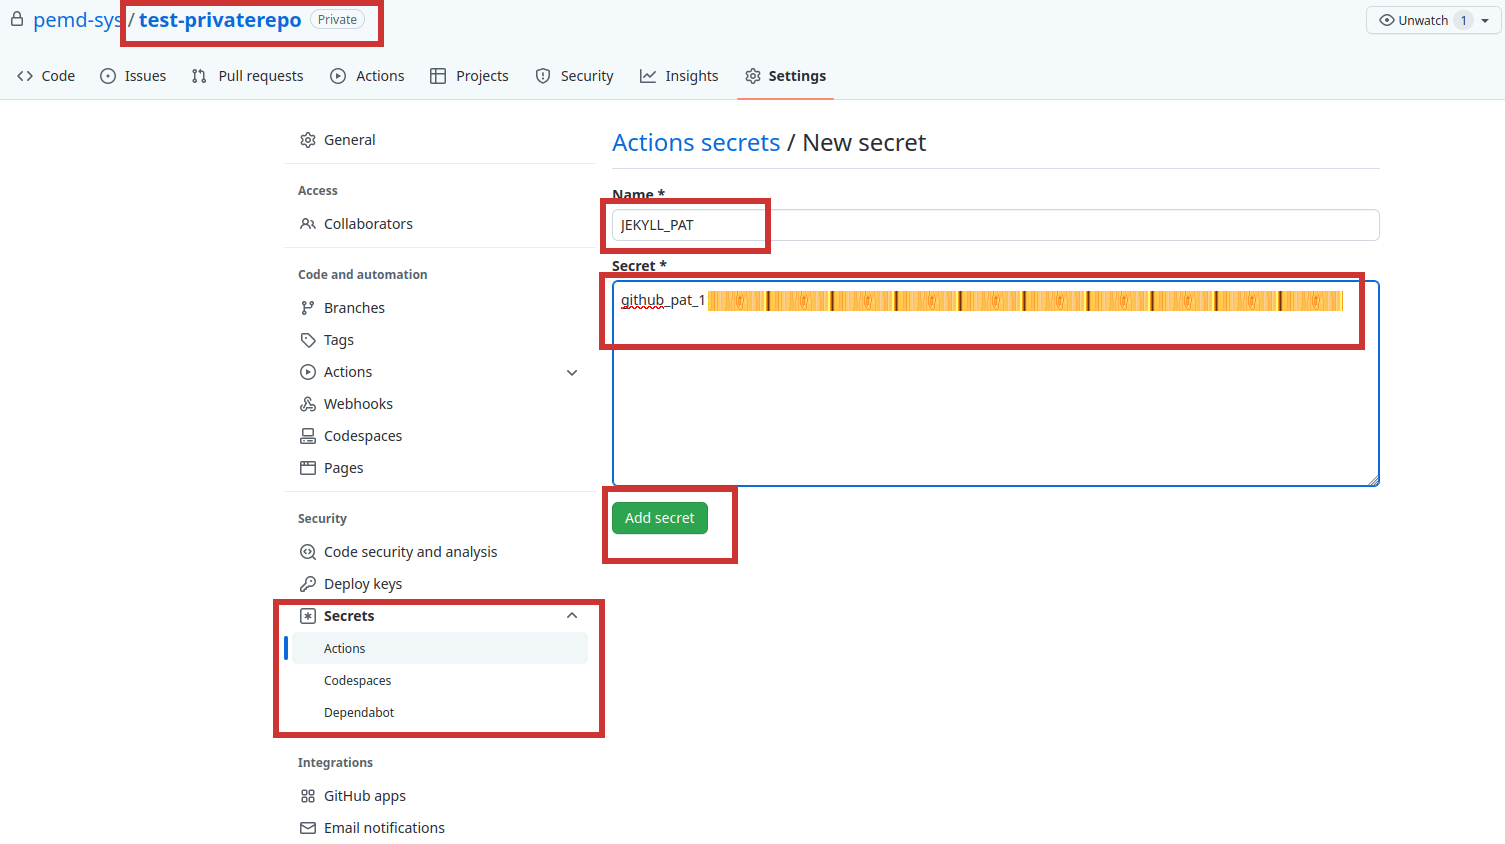 User Settings Menu
Check Github actions
Once the settings is complete, push the changes to the repository including the new /.github/workflows/pages-deploy.yml file. Then go to the private repository github webpage and check the github actions tab and see if the process completes with success. A screenshot is shown below.
 User Settings Menu